PaddleX 3.0 Face Recognition Pipeline —— Cartoon Face Recognition Tutorial
PaddleX provides a rich set of model pipelines, which are composed of one or more models. Each pipeline is designed to solve specific task problems in certain scenarios. All pipelines provided by PaddleX support quick experience. If the effect does not meet expectations, fine-tuning the model with private data is also supported. Moreover, PaddleX provides Python APIs for easy integration into personal projects. Before using it, you need to install PaddleX. For installation methods, please refer to PaddleX Installation. This tutorial uses a cartoon face recognition task as an example to introduce the usage process of the pipeline tool.
1. Selecting the Pipeline
Firstly, you need to select the corresponding PaddleX pipeline based on your task scenario. For face recognition, the corresponding pipeline is the Face Recognition Pipeline. If you are unsure about the relationship between the task and the pipeline, you can refer to the Pipeline List supported by PaddleX to understand the capabilities of each pipeline.
2. Quick Experience
In the PaddleX Face Recognition Pipeline, the model weights provided by the official are trained based on real face data. We first use a real face demonstration dataset for experience. PaddleX provides the following quick experience methods, which can be directly experienced locally through Python APIs.
- Local experience method for real face data:
(1) Download the real face demonstration dataset and extract it to the local directory. The command is as follows:
wget https://paddle-model-ecology.bj.bcebos.com/paddlex/data/face_demo_gallery.tar
tar -xf ./face_demo_gallery.tar
(2) Execute the Python script to perform image inference.
from paddlex import create_pipeline
# Create a face recognition pipeline
pipeline = create_pipeline(pipeline="face_recognition")
# Build a real face feature database
index_data = pipeline.build_index(gallery_imgs="face_demo_gallery", gallery_label="face_demo_gallery/gallery.txt")
# Image prediction
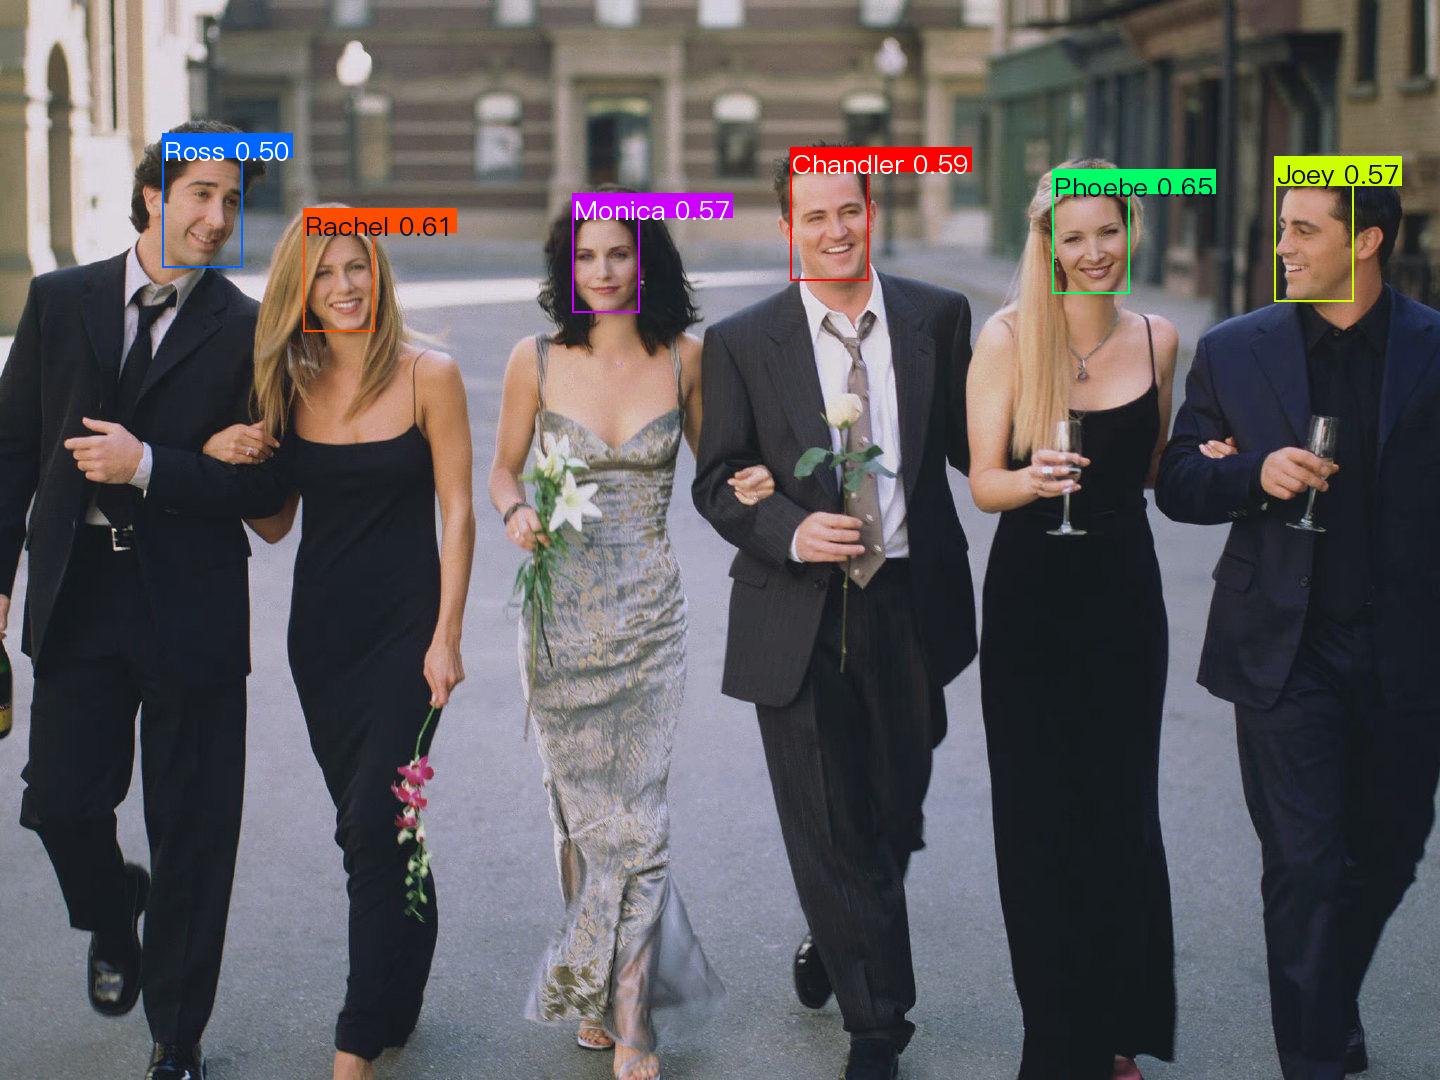
output = pipeline.predict("face_demo_gallery/test_images/friends1.jpg", index=index_data)
for res in output:
res.print()
res.save_to_img("./output/") # Save the visualized result image
Real face demo data quick experience inference result example:
- Cartoon face data local experience method:
(1) Download the cartoon face demo dataset and extract it to the local directory. The command is as follows:
wget https://paddle-model-ecology.bj.bcebos.com/paddlex/data/cartoonface_demo_gallery.tar
tar -xf ./cartoonface_demo_gallery.tar
(2) Execute the Python script to implement image inference
from paddlex import create_pipeline
# Create a face recognition pipeline
pipeline = create_pipeline(pipeline="face_recognition")
# Build a cartoon face feature index
index_data = pipeline.build_index(gallery_imgs="cartoonface_demo_gallery", gallery_label="cartoonface_demo_gallery/gallery.txt")
# Image prediction
output = pipeline.predict("cartoonface_demo_gallery/test_images/cartoon_demo.jpg", index=index_data)
for res in output:
    res.print()
    res.save_to_img("./output/") # Save the visualized result image
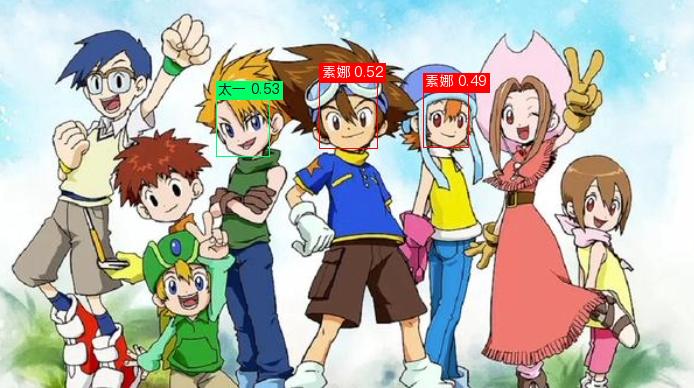
After experiencing the pipeline, it is necessary to determine whether the pipeline meets expectations (including accuracy, speed, etc.), and whether the models included in the pipeline need further fine-tuning. If the speed or accuracy of the model does not meet expectations, alternative models should be selected for continued testing to determine if the results are satisfactory. If the final results are still unsatisfactory, the models need to be fine-tuned.
This tutorial aims to achieve cartoon face recognition. From the quick experience results above, it can be observed that the official default model performs well in real face scenarios, but it fails to meet practical application requirements when inferring cartoon data, resulting in missed detections of cartoon faces and misidentifications of faces. Therefore, we need to conduct secondary development to train and fine-tune the face detection and face feature models.
3. Construction of Face Feature Database
3.1 Data Preparation
This tutorial uses a real face demonstration dataset as an example. You can download the official real face demonstration dataset and unzip it to your local directory. The command is as follows:
3. Construction of Face Feature Database
3.1 Data Preparation
This tutorial uses a real face demonstration dataset as an example. You can download the official real face demonstration dataset and extract it to your local directory. The command is as follows:
wget https://paddle-model-ecology.bj.bcebos.com/paddlex/data/face_demo_gallery.tar
tar -xf ./face_demo_gallery.tar
If you wish to build a face feature database with private data, you need to organize the data in the following manner:
data_root             # Root directory of the dataset, the directory name can be changed
├── images            # Directory for storing images, the directory name can be changed
│   ├── ID0           # Identity ID name, it is better to use meaningful names, such as names of people
│   │   ├── xxx.jpg   # Image, nested hierarchy is supported here
│   │   ├── xxx.jpg   # Image, nested hierarchy is supported here
│   │       ...
│   ├── ID1           # Identity ID name, it is better to use meaningful names, such as names of people
│   │   ├── xxx.jpg   # Image, nested hierarchy is supported here
│   │   ├── xxx.jpg   # Image, nested hierarchy is supported here
│   │       ...
│       ...
└── gallery.txt       # Annotation file for the feature library dataset, the file name can be changed. Each line provides the path and label of the image to be retrieved, separated by spaces. Example content: images/Chandler/Chandler00037.jpg Chandler
3.2 Construction of Face Feature Database
PaddleX provides a simple command for database construction. It only takes a few lines of code to build and save the face feature database:
from paddlex import create_pipeline

pipeline = create_pipeline(pipeline="face_recognition")
# gallery_imgs: root directory of gallery images, gallery_label: annotation file
index_data = pipeline.build_index(gallery_imgs="face_demo_gallery", gallery_label="face_demo_gallery/gallery.txt")
# Save the face feature gallery
index_data.save("face_index")
4. Adding and Removing from the Face Feature Database
The quality of the face feature database is crucial for the results of face recognition. For cases where the recognition effect is poor, such as under specific lighting conditions or at specific shooting angles, it is necessary to collect and add corresponding images to the feature database. Additionally, when new identities are added, the corresponding face images need to be included in the face feature database. Conversely, for incorrect indices or identities that need to be removed, the corresponding indices should be deleted from the face feature database.
PaddleX provides simple commands for adjusting the face feature database. To add images to the face feature database, you can call the append_index method; to remove indices, you can call the remove_index method. For the face recognition dataset in this tutorial, the commands for adjusting the face feature database are as follows:
from paddlex import create_pipeline

pipeline = create_pipeline("face_recognition")
index_data = pipeline.build_index(gallery_imgs="face_demo_gallery", gallery_label="face_demo_gallery/gallery.txt", index_type="Flat")
index_data.save("face_index_base")
index_data = pipeline.remove_index(remove_ids="face_demo_gallery/remove_ids.txt", index="face_index_base")
index_data.save("face_index_del")
index_data = pipeline.append_index(gallery_imgs="face_demo_gallery", gallery_label="face_demo_gallery/gallery.txt", index="face_index_del")
index_data.save("face_index_add")
Note: 1. The default "HNSW32" index method does not support deleting indexes, so "Flat" is used. For details on the differences between various index methods, please refer to the Face Recognition Pipeline Tutorial; 2. For detailed descriptions of the parameters in the commands, please refer to the Face Recognition Pipeline Tutorial.
After deleting and adding features to the base library using the above methods, test the different base libraries generated with the example images in sequence again:
from paddlex import create_pipeline
# Create a face recognition pipeline
pipeline = create_pipeline(pipeline="face_recognition")
# Pass the image to be predicted and the local feature index
output = pipeline.predict("face_demo_gallery/test_images/friends1.jpg", index='./face_index_del')
for res in output:
    res.print()
    res.save_to_img("./output/")
The visualization of the prediction results is as follows:

5. Training and Fine-Tuning a Face Detection Model with Cartoon Data
5.1 Model Selection
PaddleX provides 4 face detection models. For details, please refer to the Model List. The benchmark of some face detection models is as follows:
| Model | Model Download Link | AP(%) | GPU Inference Time (ms) [Normal Mode / High-Performance Mode] |
CPU Inference Time (ms) [Normal Mode / High-Performance Mode] |
Model Storage Size (MB) | Introduction |
|---|---|---|---|---|---|---|
| BlazeFace | Inference Model/Training Model | 50.90 / 45.74 | 71.92 / 71.92 | 84.18 / 84.18 >0.447 | A lightweight and efficient face detection model | |
| BlazeFace-FPN-SSH | Inference Model/Training Model | 18.7 | 58.99 / 51.75 | 87.39 / 87.39 | 0.606 | An improved model of BlazeFace with added FPN and SSH structures |
| PicoDet_LCNet_x2_5_face | Inference Model/Training Model | 31.4 | 33.91 / 26.53 | 153.56 / 79.21 | 28.9 | A face detection model based on PicoDet_LCNet_x2_5 |
| PP-YOLOE_plus-S_face | Inference Model/Training Model | 36.1 | 21.28 / 11.09 | 137.26 / 72.09 | 26.5 | A face detection model based on PP-YOLOE_plus-S |
Note: The above accuracy metrics are evaluated on the WIDER-FACE validation set in COCO format with an input size of 640*640. The GPU inference time for all models is based on an NVIDIA V100 machine with FP32 precision type, and the CPU inference speed is based on an Intel(R) Xeon(R) Gold 6271C CPU @ 2.60GHz with FP32 precision type.
5.2 Data Preparation and Verification
This tutorial uses the Cartoon Face Detection Dataset as an example dataset, which can be obtained using the following command. If you use your own labeled dataset, you need to adjust it according to the format requirements of PaddleX to meet the data format requirements of PaddleX. For details on data format, please refer to the PaddleX Object Detection Task Module Data Preparation Tutorial.
Dataset acquisition command:
cd /path/to/paddlex
wget https://paddle-model-ecology.bj.bcebos.com/paddlex/data/cartoonface_coco_examples.tar -P ./dataset
tar -xf ./dataset/cartoonface_coco_examples.tar -C ./dataset/
Dataset Verification, when verifying the dataset, only one command is needed:
python main.py -c paddlex/configs/modules/face_detection/PP-YOLOE_plus-S_face.yaml \
    -o Global.mode=check_dataset \
    -o Global.dataset_dir=./dataset/cartoonface_coco_examples
After executing the above command, PaddleX will verify the dataset and count the basic information of the dataset. After the command runs successfully, the information Check dataset passed ! will be printed in the log, and the related output will be saved in the ./output/check_dataset directory under the current directory. The output directory includes visualized sample images and sample distribution histograms. The verification result file is saved in ./output/check_dataset_result.json, and the specific content of the verification result file is
{
  "done_flag": true,
  "check_pass": true,
  "attributes": {
    "num_classes": 1,
    "train_samples": 2000,
    "train_sample_paths": [
      "check_dataset\/demo_img\/personai_icartoonface_dettrain_27140.jpg",
      "check_dataset\/demo_img\/personai_icartoonface_dettrain_23804.jpg",
      "check_dataset\/demo_img\/personai_icartoonface_dettrain_76484.jpg",
      "check_dataset\/demo_img\/personai_icartoonface_dettrain_18197.jpg",
      "check_dataset\/demo_img\/personai_icartoonface_dettrain_35260.jpg",
      "check_dataset\/demo_img\/personai_icartoonface_dettrain_00404.jpg",
      "check_dataset\/demo_img\/personai_icartoonface_dettrain_15455.jpg",
      "check_dataset\/demo_img\/personai_icartoonface_dettrain_10119.jpg",
      "check_dataset\/demo_img\/personai_icartoonface_dettrain_26397.jpg",
      "check_dataset\/demo_img\/personai_icartoonface_dettrain_17044.jpg"
    ],
    "val_samples": 500,
    "val_sample_paths": [
      "check_dataset\/demo_img\/personai_icartoonface_dettrain_77030.jpg",
      "check_dataset\/demo_img\/personai_icartoonface_dettrain_36265.jpg",
      "check_dataset\/demo_img\/personai_icartoonface_dettrain_63390.jpg",
      "check_dataset\/demo_img\/personai_icartoonface_dettrain_59167.jpg",
      "check_dataset\/demo_img\/personai_icartoonface_dettrain_82024.jpg",
      "check_dataset\/demo_img\/personai_icartoonface_dettrain_50449.jpg",
      "check_dataset\/demo_img\/personai_icartoonface_dettrain_71386.jpg",
      "check_dataset\/demo_img\/personai_icartoonface_dettrain_23112.jpg",
      "check_dataset\/demo_img\/personai_icartoonface_dettrain_69609.jpg",
      "check_dataset\/demo_img\/personai_icartoonface_dettrain_39296.jpg"
    ]
  },
  "analysis": {
    "histogram": "check_dataset\/histogram.png"
  },
  "dataset_path": ".\/dataset\/cartoonface_coco_examples",
  "show_type": "image",
  "dataset_type": "COCODetDataset"
}
In the above verification results, check_pass being True indicates that the dataset format meets the requirements. The explanations for the other metrics are as follows:
* attributes.num_classes: This dataset contains only one category, which is human faces.
* attributes.train_samples: The number of training samples in this dataset is 2000.
* attributes.val_samples: The number of validation samples in this dataset is 500.
* attributes.train_sample_paths: This is a list of relative paths to the visualized training samples.
* attributes.val_sample_paths: This is a list of relative paths to the visualized validation samples.
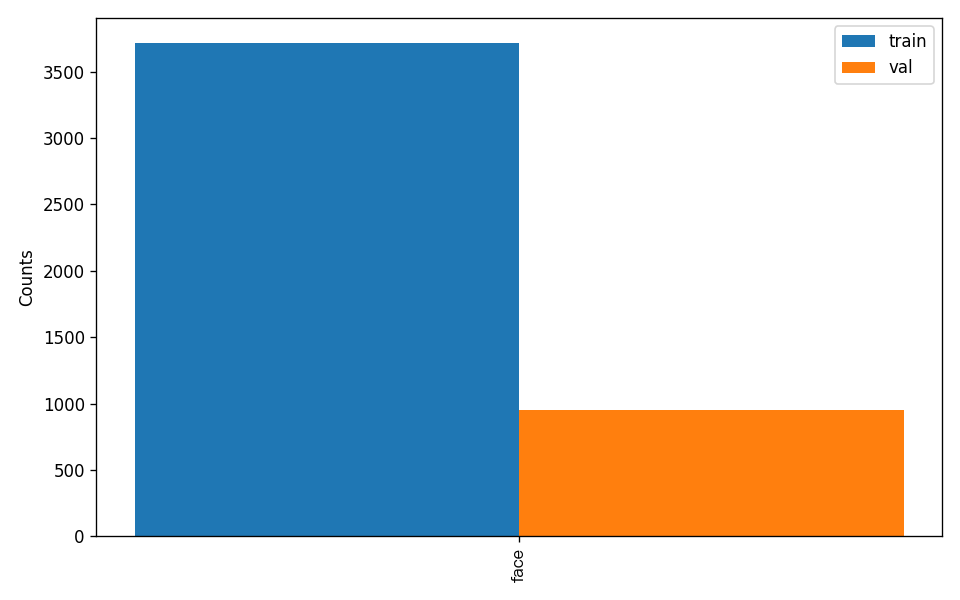
Additionally, the dataset verification has analyzed the distribution of annotation counts for all categories in the dataset and generated a histogram (histogram.png):
Note: Only datasets that pass the verification can be used for training and evaluation.
Dataset Format Conversion / Dataset Splitting (Optional)
If you need to convert the dataset format or re-split the dataset, you can set this by modifying the configuration file or appending hyperparameters.
Parameters related to dataset verification can be set by modifying the fields under CheckDataset in the configuration file. Some example explanations of the parameters in the configuration file are as follows:
CheckDataset:convert:enable: Whether to perform dataset format conversion. If set toTrue, the dataset format will be converted. The default isFalse.src_dataset_type: If dataset format conversion is performed, you need to specify the source dataset format. The available source formats areLabelMeandVOC.
split:enable: Whether to re-split the dataset. If set toTrue, the dataset will be re-split. The default isFalse.train_percent: If re-splitting the dataset, you need to set the percentage of the training set. This should be an integer between0 and 100, and it must sum to 100 withval_percent.val_percent: If re-splitting the dataset, you need to set the percentage of the validation set. This should be an integer between 0 and 100, and it must sum to 100 withtrain_percent.
Both data conversion and data splitting can be enabled simultaneously. For data splitting, the original annotation file will be renamed to xxx.bak in the original path. These parameters can also be set by appending command-line arguments, for example, to re-split the dataset and set the training and validation set ratios: -o CheckDataset.split.enable=True -o CheckDataset.split.train_percent=80 -o CheckDataset.split.val_percent=20.
5.3 Model Training and Evaluation
Model Training
Before training, please ensure that you have verified the dataset. To complete the training of a PaddleX model, you only need the following command:
python main.py -c paddlex/configs/modules/face_detection/PP-YOLOE_plus-S_face.yaml \
    -o Global.mode=train \
    -o Global.dataset_dir=./dataset/cartoonface_coco_examples \
    -o Train.epochs_iters=10
In PaddleX, model training supports functions such as modifying training hyperparameters and single-machine single-card/multi-card training. You only need to modify the configuration file or append command-line parameters.
Each model in PaddleX provides a configuration file for model development, which is used to set related parameters. Parameters related to model training can be set by modifying the fields under Train in the configuration file. Some examples of parameters in the configuration file are as follows:
Global:mode: Mode, supports data validation (check_dataset), model training (train), and model evaluation (evaluate);device: Training device, options includecpu,gpu,xpu,npu,mlu. Except forcpu, multi-card training can specify card numbers, such as:gpu:0,1,2,3;
Train: Training hyperparameter settings;epochs_iters: Setting for the number of training epochs;learning_rate: Setting for the training learning rate;
For more information on hyperparameters, please refer to PaddleX General Model Configuration File Parameter Description.
Note:
- The above parameters can be set by appending command-line parameters. For example, to specify the mode as model training:
-o Global.mode=train; to specify training on the first 2 GPUs:-o Global.device=gpu:0,1; to set the number of training epochs to 10:-o Train.epochs_iters=10. - During model training, PaddleX automatically saves the model weight files, with the default directory being
output. If you need to specify a save path, you can use the-o Global.outputfield in the configuration file. - PaddleX abstracts away the concepts of dynamic graph weights and static graph weights for you. During model training, both dynamic graph and static graph weights are generated. By default, static graph weights are used for model inference.
Training Output Explanation:
After completing model training, all outputs are saved in the specified output directory (default is ./output/). The usual outputs include:
train_result.json: Training result record file, which records whether the training task was completed normally, as well as the weight metrics, related file paths, etc.;train.log: Training log file, which records the changes in model metrics and loss during the training process;config.yaml: Training configuration file, which records the hyperparameter settings for this training session;.pdparams,.pdema,.pdopt.pdstate,.pdiparams,.pdmodel: Model weight-related files, including network parameters, optimizer, EMA, static graph network parameters, static graph network structure, etc.;
Model Evaluation
After completing model training, you can evaluate the specified model weight file on the validation set to verify the model's accuracy. To perform model evaluation using PaddleX, you only need one command:
python main.py -c paddlex/configs/modules/face_detection/PP-YOLOE_plus-S.yaml \
    -o Global.mode=evaluate \
    -o Global.dataset_dir=./dataset/cartoonface_coco_examples
Note: When evaluating the model, you need to specify the path to the model weight file. Each configuration file has a default weight save path built-in. If you need to change it, you can simply set it by adding a command-line parameter, such as -o Evaluate.weight_path=./output/best_model/best_model.pdparams.
5.4 Model Tuning
After learning about model training and evaluation, we can improve the model's accuracy by adjusting hyperparameters. By reasonably adjusting the number of training epochs, you can control the depth of model training to avoid overfitting or underfitting. The learning rate setting is related to the speed and stability of model convergence. Therefore, when optimizing model performance, it is essential to carefully consider the values of these two parameters and flexibly adjust them according to the actual situation to achieve the best training results.
It is recommended to follow the control variable method when debugging parameters: 1. First, fix the training iteration to 10 and batch size to 4. 2. Based on the PP-YOLOE_plus-S_face model, start two experiments with learning rates of 0.001 and 0.0001, respectively. 3. It can be observed that the highest accuracy configuration in Experiment 2 is with a learning rate of 0.0001. On this training hyperparameter basis, increase the number of training epochs to 20, and you can achieve better accuracy.
Learning rate exploration experiment results:
| Experiment | Epochs | Learning Rate | Batch Size | Training Environment | mAP@0.5 |
|---|---|---|---|---|---|
| Experiment 1 | 10 | 0.001 | 4 | 4 GPUs | 0.323 |
| 10 | 0.0001 | 4 | 4 GPUs | 0.334 |
Changing epoch experiment results:
| Experiment | Epochs | Learning Rate | Batch Size | Training Environment | mAP@0.5 |
|---|---|---|---|---|---|
| Experiment 2 | 10 | 0.0001 | 4 | 4 GPUs | 0.334 |
| Experiment 2 with increased epochs | 20 | 0.0001 | 4 | 4 GPUs | 0.360 |
Note: This tutorial is for a 4-GPU setup. If you only have one GPU, you can adjust the number of training GPUs to complete this experiment. However, the final metrics may not align with the above metrics, which is a normal situation.
5.5 Model Inference
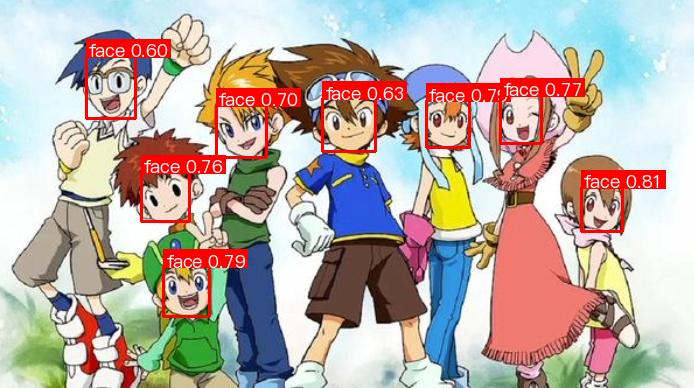
After completing model training, evaluation, and fine-tuning, you can use the model weights that satisfy your metrics for inference prediction. To perform inference prediction via the command line, you only need the following command. We use the cartoon face demonstration data with poor performance from the official model weights in the previous Quick Experience for inference.
python main.py -c paddlex/configs/modules/face_detection/PP-YOLOE_plus-S.yaml \
    -o Global.mode=predict \
    -o Predict.model_dir="output/best_model/inference" \
    -o Predict.input="cartoonface_demo_gallery/test_images/cartoon_demo.jpg"
The prediction results can be generated under ./output through the above instructions, and the prediction result of cartoon_demo.jpg is as follows:
6. Fine-tuning Face Feature Model with Cartoon Data
During the training process of PaddleX, the path of the best model will be saved to output/best_model/inference. Before starting the experiment in this section, please note to save the optimal weights from previous experiments to another path to avoid being overwritten by new experiments.
6.1 Model Selection
PaddleX provides 2 face feature models. For details, please refer to the Model List. The benchmark of the face feature models is as follows:
| Model | Model Download Link | Output Feature Dimension | Acc (%) AgeDB-30/CFP-FP/LFW |
GPU Inference Time (ms) [Normal Mode / High Performance Mode] |
CPU Inference Time (ms) [Normal Mode / High Performance Mode] |
Model Storage Size (MB) | Introduction |
|---|---|---|---|---|---|---|---|
| MobileFaceNet | Inference Model/Training Model | 128 | 96.28/96.71/99.58 | 3.31 / 0.73 | 5.93 / 1.30 | 4.1 | A face feature extraction model trained on the MS1Mv3 dataset based on MobileFaceNet |
| ResNet50_face | Inference Model/Training Model | 512 | 98.12/98.56/99.77 | 6.12 / 3.11 | 15.85 / 9.44 | 87.2 | A face feature extraction model trained on the MS1Mv3 dataset based on ResNet50 |
Note: The above accuracy metrics are measured on the AgeDB-30, CFP-FP, and LFW datasets. The GPU inference time is based on NVIDIA Tesla T4, with precision type FP32. The CPU inference speed is based on Intel(R) Xeon(R) Gold 5117 CPU @ 2.00GHz, with 8 threads and precision type FP32.
6.2 Data Preparation and Verification
This tutorial uses the Cartoon Face Recognition Dataset as the example dataset, which can be obtained through the following command. If you use your own labeled dataset, you need to adjust it according to the format requirements of PaddleX to meet the data format requirements of PaddleX. For details on data format, please refer to the Face Feature Module Tutorial Document.
Dataset acquisition command:
cd /path/to/paddlex
wget https://paddle-model-ecology.bj.bcebos.com/paddlex/data/cartoonface_rec_examples.tar -P ./dataset
tar -xf ./dataset/cartoonface_rec_examples.tar -C ./dataset/
Data Validation When validating a dataset, only one command is needed:
python main.py -c paddlex/configs/modules/face_feature/ResNet50_face.yaml \
    -o Global.mode=check_dataset \
    -o Global.dataset_dir=./dataset/cartoonface_rec_examples
After executing the above command, PaddleX will verify the dataset and collect basic information about the dataset. Upon successful execution of the command, the message Check dataset passed ! will be printed in the log. The related outputs will be saved in the ./output/check_dataset directory under the current directory, which includes visualized example sample images. The verification result file is saved in ./output/check_dataset_result.json, and the specific content of the verification result file is
{
  "done_flag": true,
  "check_pass": true,
  "attributes": {
    "train_label_file": "..\/..\/dataset\/cartoonface_rec_examples\/train\/label.txt",
    "train_num_classes": 5006,
    "train_samples": 77934,
    "train_sample_paths": [
      "check_dataset\/demo_img\/0000259.jpg",
      "check_dataset\/demo_img\/0000052.jpg",
      "check_dataset\/demo_img\/0000009.jpg",
      "check_dataset\/demo_img\/0000203.jpg",
      "check_dataset\/demo_img\/0000007.jpg",
      "check_dataset\/demo_img\/0000055.jpg",
      "check_dataset\/demo_img\/0000273.jpg",
      "check_dataset\/demo_img\/0000006.jpg",
      "check_dataset\/demo_img\/0000155.jpg",
      "check_dataset\/demo_img\/0000006.jpg"
    ],
    "val_label_file": "..\/..\/dataset\/cartoonface_rec_examples\/val\/pair_label.txt",
    "val_num_classes": 2,
    "val_samples": 8000,
    "val_sample_paths": [
      "check_dataset\/demo_img\/0000011.jpg",
      "check_dataset\/demo_img\/0000121.jpg",
      "check_dataset\/demo_img\/0000118.jpg",
      "check_dataset\/demo_img\/0000034.jpg",
      "check_dataset\/demo_img\/0000229.jpg",
      "check_dataset\/demo_img\/0000070.jpg",
      "check_dataset\/demo_img\/0000033.jpg",
      "check_dataset\/demo_img\/0000089.jpg",
      "check_dataset\/demo_img\/0000139.jpg",
      "check_dataset\/demo_img\/0000081.jpg"
    ]
  },
  "analysis": {},
  "dataset_path": ".\/dataset\/cartoonface_rec_examples",
  "show_type": "image",
  "dataset_type": "ClsDataset"
}
The above verification results indicate that check_pass being True means the dataset format meets the requirements. The explanations for other metrics are as follows:
* attributes.train_num_classes: The training set of this dataset contains 5006 face classes, and this number of classes is the number that needs to be passed for subsequent training;
* attributes.val_num_classes: The validation set of the face feature model only has two classes, 0 and 1, representing that two face images do not belong to the same identity and belong to the same identity, respectively;
* attributes.train_samples: The number of samples in the training set of this dataset is 77934;
* attributes.val_samples: The number of samples in the validation set of this dataset is 8000;
* attributes.train_sample_paths: The list of relative paths for visualizing the samples in the training set of this dataset;
* attributes.val_sample_paths: The list of relative paths for visualizing the samples in the validation set of this dataset;
Note: Only data that has passed the data verification can be used for training and evaluation.
6.3 Model Training and Model Evaluation
Model Training
Before training, please ensure that you have verified the dataset. To complete the training of the PaddleX model, simply use the following command:
python main.py -c paddlex/configs/modules/face_feature/ResNet50_face.yaml \
    -o Global.mode=train \
    -o Global.dataset_dir=./dataset/cartoonface_rec_examples \
    -o Train.num_classes=5006 \
    -o Train.log_interval=50
In PaddleX, model training supports features such as modifying training hyperparameters and single-machine single-card/multi-card training. You only need to modify the configuration file or append command-line parameters.
Each model in PaddleX provides a configuration file for model development to set relevant parameters. Parameters related to model training can be set by modifying the fields under Train in the configuration file. Some examples of parameters in the configuration file are as follows:
Global:mode: Mode, supports data validation (check_dataset), model training (train), and model evaluation (evaluate);device: Training device, options includecpu,gpu,xpu,npu,mlu. Except forcpu, multi-card training can specify card numbers, such as:gpu:0,1,2,3;
Train: Training hyperparameter settings;epochs_iters: Setting for the number of training epochs;learning_rate: Setting for the training learning rate;
For more information on hyperparameters, please refer to PaddleX General Model Configuration File Parameter Description
Note:
- The above parameters can be set by appending command-line parameters, such as specifying the mode as model training:
-o Global.mode=train; specifying training on the first 2 GPUs:-o Global.device=gpu:0,1; setting the number of training epochs to 50:-o Train.epochs_iters=50. - During model training, PaddleX will automatically save the model weight, files with the default directory being
output. If you need to specify a save path, you can use the-o Global.outputfield in the configuration file. - PaddleX hides the concept of dynamic graph weights and static graph weights from you. During model training, both dynamic graph and static graph weights will be generated. By default, static graph weights are used for model inference.
Training output explanation:
After completing model training, all outputs are saved in the specified output directory (default is ./output/), and typically include the following:
* train_result.json: Training result record file, which records whether the training task was completed normally, as well as the metrics of the generated weights and relevant file paths;
* train.log: Training log file, which records changes in model metrics and loss during the training process;
* config.yaml: Training configuration file, which records the hyperparameter settings for this training session;
* .pdparams, .pdema, .pdopt.pdstate, .pdiparams, .pdmodel: Model weight-related files, including network parameters, optimizer, EMA, static graph network parameters, and static graph network structure;
Model Evaluation
After completing model training, you can evaluate the specified model weight file on the validation set to verify the model's accuracy. To perform model evaluation using PaddleX, you only need a single command:
python main.py -c paddlex/configs/modules/face_feature/ResNet50_face.yaml \
    -o Global.mode=evaluate \
    -o Global.dataset_dir=./dataset/cartoonface_rec_examples \
    -o Evaluate.log_interval=50
5.4 Model Tuning
The face feature model in PaddleX is trained based on the ArcFace loss function. In addition to learning rate and number of training epochs, the margin parameter in the ArcFace loss function is a key hyperparameter. It enhances the separability between classes by introducing a fixed angular margin in the angular space, thereby improving the model's discriminative ability. In our model tuning experiments, we mainly focus on experimenting with the margin parameter.
The size of the margin has a significant impact on the training effect and final performance of the model. Generally speaking: increasing the margin makes the decision boundaries between different classes more distinct, forcing the model to separate the feature vectors of different classes more widely in the feature space, thereby improving the separability between classes. However, an overly large margin may increase the optimization difficulty during training, slow down the convergence speed, or even prevent convergence. Additionally, in cases where the training data is insufficient or the data noise is high, an overly large margin may cause the model to overfit the training data, reducing its generalization ability on unseen data.
A smaller margin can reduce the training difficulty of the model and make it easier to converge. For training sets with small data volume or low data quality, reducing the margin can lower the risk of overfitting and improve the model's generalization ability. However, an overly small margin may not be sufficient to separate the features of different classes widely enough, and the model may fail to learn discriminative features, affecting recognition accuracy.
In the data validation phase, we can see that the cartoon face recognition dataset we used has 77,934 training samples. Compared to general face recognition datasets (MS1Mv2 with 5.8 million, Glint360K with 17 million), it is a relatively small dataset. Therefore, when training the face feature model using this dataset, we recommend reducing the margin parameter to lower the risk of overfitting and improve the model's generalization ability. In PaddleX, you can specify the value of the margin parameter during face feature model training by adding the command-line parameter -o Train.arcmargin_m=xx. Example training command:
python main.py -c paddlex/configs/modules/face_feature/ResNet50_face.yaml \
    -o Global.mode=train \
    -o Global.dataset_dir=./dataset/cartoonface_rec_examples \
    -o Train.num_classes=5006 \
    -o Train.log_interval=50 \
    -o Train.arcmargin_m=0.3
When debugging parameters, follow the control variable method: 1. Fix the training iteration to 20 and the learning rate to 4e-4. 2. Launch two experiments based on the ResNet50_face model with margins of 0.5 and 0.3, respectively.
Margin exploration experiment results:
| Experiment | Epochs | Learning Rate | Margin | Training Environment | Acc |
|---|---|---|---|---|---|
| Experiment 1 | 25 | 4e-4 | 0.5 | 4 GPUs | 0.925 |
| Experiment 2 | 25 | 4e-4 | 0.3 | 4 GPUs | 0.928 |
Note: This tutorial is designed for a 4-GPU setup. If you only have 1 GPU, you can adjust the number of training GPUs to complete the experiment. However, the final metrics may not align with the above metrics, which is a normal situation.
7. pipeline Integration
After fine-tuning the face detection model and face feature model with cartoon scene data, you can select the high-precision model weights to integrate into the PaddleX face recognition pipeline.
First, obtain the face_recognition pipeline configuration file and load the configuration file for prediction. You can execute the following command to save the results in my_path:
Modify SubModules.Detection.model_dir and SubModules.Recognition.model_dir in the configuration file to the paths of your fine-tuned face detection model and face feature model, respectively. If you need to directly integrate the face recognition pipeline into your Python project, you can refer to the following example:
pipeline_name: face_recognition

index: None
det_threshold: 0.6
rec_threshold: 0.4
rec_topk: 5

SubModules:
  Detection:
    module_name: face_detection
    model_name: PP-YOLOE_plus-S_face
    model_dir: "path/to/your/det_model" # # Face detection model fine-tuned with cartoon face data
    batch_size: 1
  Recognition:
    module_name: face_feature
    model_name: ResNet50_face
    model_dir: "path/to/your/rec_model" # Face feature model fine-tuned with cartoon face data
    batch_size: 1
Subsequently, in your Python code, you can use the pipeline as follows:
from paddlex import create_pipeline
# Create a face recognition pipeline
pipeline = create_pipeline(pipeline="my_path/face_recognition.yaml")
# Build a cartoon face feature database
index_data = pipeline.build_index(gallery_imgs="cartoonface_demo_gallery", gallery_label="cartoonface_demo_gallery/gallery.txt")
# Predict the cartoon demo image
output = pipeline.predict("cartoonface_demo_gallery/test_images/cartoon_demo.jpg", index=index_data)
for res in output:
    res.print()
    res.save_to_img("./output/") # Save the result to an image
If there is a case where a cartoon face can be detected but is recognized as "Unknown0.00", you can modify the rec_thresholds in the configuration file and try again after lowering the retrieval threshold. If there are cases of face recognition errors, please replace the optimal weights with the weights from the last training round, or replace the recognition model weights trained with different hyperparameters and try again.
8. pipeline Service Deployment
In addition to the Python API integration development method mentioned earlier, PaddleX also provides high-performance deployment and serving deployment capabilities, which are detailed as follows: * High-performance deployment: In actual production environments, many applications have strict standards for the performance metrics of deployment strategies (especially response speed) to ensure the efficient operation of the system and the smoothness of user experience. To this end, PaddleX provides a high-performance inference plugin, which aims to deeply optimize the performance of model inference and pre- and post-processing, achieving significant acceleration of the end-to-end process. For detailed high-performance deployment procedures, please refer to the PaddleX High-Performance Inference Guide. * Serving Deployment: Serving Deployment is a common form of deployment in actual production environments. By encapsulating the inference function as a service, clients can access these services through network requests to obtain inference results. PaddleX supports users in achieving serving deployment of the pipeline at a low cost. For detailed serving deployment procedures, please refer to the PaddleX Serving Deployment Guide.
You can choose the appropriate method to deploy the pipeline according to your needs, and then proceed with subsequent AI application integration. This section takes serving deployment as an example and guides you through the serving deployment of the pipeline and API calls, which can be completed in just 5 simple steps:
(1) Execute the following Python script to save the feature database of the cartoon face demonstration data.
from paddlex import create_pipeline
# Create a face recognition pipeline
pipeline = create_pipeline(pipeline="face_recognition")
# Build a cartoon face feature database
index_data = pipeline.build_index(gallery_imgs="cartoonface_demo_gallery", gallery_label="cartoonface_demo_gallery/gallery.txt")
# Save the cartoon face feature database
index_data.save("cartoonface_index")
(2) Execute the following command in the command line to install the serving deployment plugin
(3) Obtain the face recognition pipeline configuration file
(4) Modify the configuration file to set the directory for the feature database.
pipeline_name: face_recognition

index: ./cartoonface_index # Local feature database directory, using the feature database constructed in step (1)
det_threshold: 0.6
rec_threshold: 0.4
rec_topk: 5

SubModules:
  Detection:
    module_name: face_detection
    model_name: PP-YOLOE_plus-S_face
    model_dir: "path/to/your/det_model" # Face detection model fine-tuned with cartoon face data
    batch_size: 1
  Recognition:
    module_name: face_feature
    model_name: ResNet50_face
    model_dir: "path/to/your/rec_model" # Face feature model fine-tuned with cartoon face data
    batch_size: 1
(5) Start the server-side service
Client Invocation
PaddleX provides simple and convenient invocation interfaces and example code. Here, we use a simple image inference as an example. For more detailed invocation interface support, please refer to the Face Recognition Pipeline Usage Tutorial.
Client invocation example code:
import base64
import pprint
import sys

import requests

API_BASE_URL = "http://0.0.0.0:8080"

infer_image_path = "cartoonface_demo_gallery/test_images/cartoon_demo.jpg" # test image path

with open(infer_image_path, "rb") as file:
    image_bytes = file.read()
    image_data = base64.b64encode(image_bytes).decode("ascii")

payload = {"image": image_data}
resp_infer = requests.post(f"{API_BASE_URL}/face-recognition-infer", json=payload)
if resp_infer.status_code != 200:
    print(f"Request to face-recognition-infer failed with status code {resp_infer}.")
    pprint.pp(resp_infer.json())
    sys.exit(1)
result_infer = resp_infer.json()["result"]

output_image_path = './out.jpg'
with open(output_image_path, "wb") as file:
    file.write(base64.b64decode(result_infer["image"]))
print(f"Output image saved at {output_image_path}")
print("\nDetected faces:")
pprint.pp(result_infer["faces"])
After executing the example code, you can view the inference results of the service deployment in the output log and the saved inference images respectively.