General Instance Segmentation Pipeline Tutorial
1. Introduction to the General Instance Segmentation Pipeline
Instance segmentation is a computer vision task that not only identifies the object categories in an image but also distinguishes the pixels of different instances within the same category, enabling precise segmentation of each object. Instance segmentation can separately label each car, person, or animal in an image, ensuring they are independently processed at the pixel level. For example, in a street scene image containing multiple cars and pedestrians, instance segmentation can clearly separate the contours of each car and person, forming multiple independent region labels. This technology is widely used in autonomous driving, video surveillance, and robotic vision, often relying on deep learning models (such as Mask R-CNN) to achieve efficient pixel classification and instance differentiation through Convolutional Neural Networks (CNNs), providing powerful support for understanding complex scenes.
 The General Instance Segmentation Pipeline includes a Object Detection module. If you prioritize model precision, choose a model with higher precision. If you prioritize inference speed, choose a model with faster inference. If you prioritize model storage size, choose a model with a smaller storage size.
The inference time only includes the model inference time and does not include the time for pre- or post-processing.
| Model | Model Download Link | Mask AP | GPU Inference Time (ms) [Normal Mode / High-Performance Mode] |
CPU Inference Time (ms) [Normal Mode / High-Performance Mode] |
Model Storage Size (MB) | Description |
|---|---|---|---|---|---|---|
| Mask-RT-DETR-H | Inference Model/Training Model | 50.6 | 180.83 / 180.83 | 1711.24 / 1711.24 | 449.9 | Mask-RT-DETR is an instance segmentation model based on RT-DETR. By adopting the high-performance PP-HGNetV2 as the backbone network and constructing a MaskHybridEncoder encoder, along with introducing IOU-aware Query Selection technology, it achieves state-of-the-art (SOTA) instance segmentation accuracy with the same inference time. |
| Mask-RT-DETR-L | Inference Model/Training Model | 45.7 | 113.20 / 113.20 | 1179.56 / 1179.56 | 113.6 |
❗ The above list features the 2 core models that the image classification module primarily supports. In total, this module supports 15 models. The complete list of models is as follows:
👉Model List Details
| Model | Model Download Link | Mask AP | GPU Inference Time (ms) [Normal Mode / High-Performance Mode] |
CPU Inference Time (ms) [Normal Mode / High-Performance Mode] |
Model Storage Size (MB) | Description |
|---|---|---|---|---|---|---|
| Cascade-MaskRCNN-ResNet50-FPN | Inference Model/Training Model | 36.3 | 136.79 / 136.79 | - / 5935.41 | 254.8 | Cascade-MaskRCNN is an improved Mask RCNN instance segmentation model that utilizes multiple detectors in a cascade, optimizing segmentation results by leveraging different IOU thresholds to address the mismatch between detection and inference stages, thereby enhancing instance segmentation accuracy. |
| Cascade-MaskRCNN-ResNet50-vd-SSLDv2-FPN | Inference Model/Training Model | 39.1 | 137.40 / 137.40 | - / 6816.68 | 254.7 | |
| Mask-RT-DETR-H | Inference Model/Training Model | 50.6 | 180.83 / 180.83 | 1711.24 / 1711.24 | 449.9 | Mask-RT-DETR is an instance segmentation model based on RT-DETR. By adopting the high-performance PP-HGNetV2 as the backbone network and constructing a MaskHybridEncoder encoder, along with introducing IOU-aware Query Selection technology, it achieves state-of-the-art (SOTA) instance segmentation accuracy with the same inference time. |
| Mask-RT-DETR-L | Inference Model/Training Model | 45.7 | 113.20 / 113.20 | 1179.56 / 1179.56 | 113.6 | |
| Mask-RT-DETR-M | Inference Model/Training Model | 42.7 | 87.08 / 87.08 | - / 2090.73 | 66.6 | |
| Mask-RT-DETR-S | Inference Model/Training Model | 41.0 | 120.86 / 120.86 | - / 2163.07 | 51.8 | |
| Mask-RT-DETR-X | Inference Model/Training Model | 47.5 | 141.43 / 141.43 | 1379.14 / 1379.14 | 237.5 | |
| MaskRCNN-ResNet50-FPN | Inference Model/Training Model | 35.6 | 112.79 / 112.79 | - / 4912.37 | 157.5 | Mask R-CNN is a full-task deep learning model from Facebook AI Research (FAIR) that can perform object classification and localization in a single model, combined with image-level masks to complete segmentation tasks. |
| MaskRCNN-ResNet50-vd-FPN | Inference Model/Training Model | 36.4 | 112.88 / 112.88 | - / 5204.97 | 157.5 | |
| MaskRCNN-ResNet50 | Inference Model/Training Model | 32.8 | 181.60 / 181.60 | - / 5523.45 | 128.7 | |
| MaskRCNN-ResNet101-FPN | Inference Model/Training Model | 36.6 | 138.84 / 138.84 | - / 5107.74 | 225.4 | |
| MaskRCNN-ResNet101-vd-FPN | Inference Model/Training Model | 38.1 | 141.73 / 141.73 | - / 5592.76 | 225.1 | |
| MaskRCNN-ResNeXt101-vd-FPN | Inference Model/Training Model | 39.5 | 220.83 / 220.83 | - / 5932.59 | 370.0 | |
| PP-YOLOE_seg-S | Inference Model/Training Model | 32.5 | 243.41 / 222.30 | 2507.70 / 1282.35 | 31.5 | PP-YOLOE_seg is an instance segmentation model based on PP-YOLOE. This model inherits PP-YOLOE's backbone and head, significantly enhancing instance segmentation performance and inference speed through the design of a PP-YOLOE instance segmentation head. |
| SOLOv2 | Inference Model/Training Model | 35.5 | 131.99 / 131.99 | - / 2369.98 | 179.1 | SOLOv2 is a real-time instance segmentation algorithm that segments objects by location. This model is an improved version of SOLO, achieving a good balance between accuracy and speed through the introduction of mask learning and mask NMS. |
- Performance Test Environment
- Test Dataset:COCO2017 validation set.
- Hardware Configuration:
- GPU: NVIDIA Tesla T4
- CPU: Intel Xeon Gold 6271C @ 2.60GHz
- Software Environment:
- Ubuntu 20.04 / CUDA 11.8 / cuDNN 8.9 / TensorRT 8.6.1.6
- paddlepaddle 3.0.0 / paddlex 3.0.3
| Mode | GPU Configuration | CPU Configuration | Acceleration Technology Combination |
|---|---|---|---|
| Normal Mode | FP32 Precision / No TRT Acceleration | FP32 Precision / 8 Threads | PaddleInference |
| High-Performance Mode | Optimal combination of pre-selected precision types and acceleration strategies | FP32 Precision / 8 Threads | Pre-selected optimal backend (Paddle/OpenVINO/TRT, etc.) |
2. Quick Start
The pre-trained model pipelines provided by PaddleX allow for quick experience of the effects. You can experience the effects of the General Instance Segmentation Pipeline online or locally using command line or Python.
2.1 Online Experience
You can experience online the effects of the General Instance Segmentation Pipeline using the demo images provided by the official. For example:

If you are satisfied with the pipeline's performance, you can directly integrate and deploy it. If not, you can also use your private data to fine-tune the model within the pipeline.
2.2 Local Experience
❗ Before using the general instance segmentation pipeline locally, please ensure that you have completed the installation of the PaddleX wheel package according to the PaddleX Local Installation Guide. If you wish to selectively install dependencies, please refer to the relevant instructions in the installation guide. The dependency group corresponding to this pipeline is
cv.
2.2.1 Command Line Experience
- You can quickly experience the instance segmentation pipeline effect with a single command. Use the test file, and replace
--inputwith the local path for prediction.
paddlex --pipeline instance_segmentation \
        --input general_instance_segmentation_004.png \
        --threshold 0.5 \
        --save_path ./output \
        --device gpu:0
The relevant parameter descriptions can be referred to in the parameter explanations in 2.2.2 Python Script Integration. Supports specifying multiple devices simultaneously for parallel inference. For details, please refer to the documentation on pipeline parallel inference.
After running, the result will be printed to the terminal as follows:
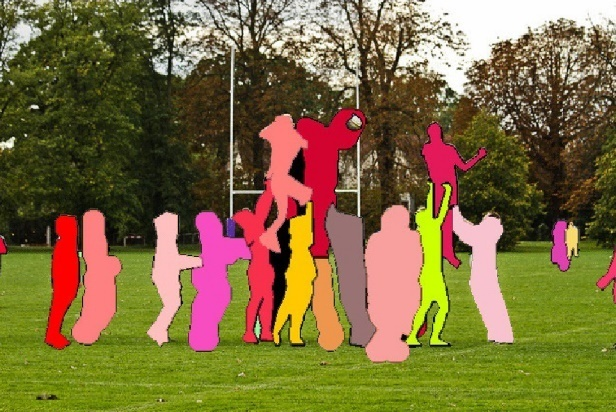
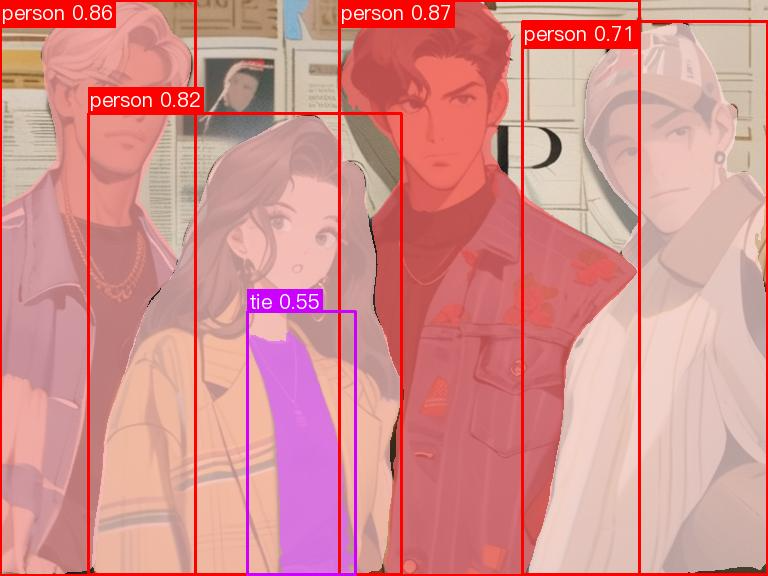
{'res': {'input_path': 'general_instance_segmentation_004.png', 'page_index': None, 'boxes': [{'cls_id': 0, 'label': 'person', 'score': 0.8695873022079468, 'coordinate': [339.83426, 0, 639.8651, 575.22003]}, {'cls_id': 0, 'label': 'person', 'score': 0.8572642803192139, 'coordinate': [0.09976959, 0, 195.07274, 575.358]}, {'cls_id': 0, 'label': 'person', 'score': 0.8201770186424255, 'coordinate': [88.24664, 113.422424, 401.23077, 574.70197]}, {'cls_id': 0, 'label': 'person', 'score': 0.7110118269920349, 'coordinate': [522.54065, 21.457964, 767.5007, 574.2464]}, {'cls_id': 27, 'label': 'tie', 'score': 0.5543721914291382, 'coordinate': [247.38776, 312.4094, 355.2685, 574.1264]}], 'masks': '...'}}
The explanation of the result parameters can be referred to in 2.2.2 Python Script Integration.
The visualization results are saved under save_path, and the visualization results of instance segmentation are as follows:
2.2.2 Python Script Integration
- The above command line is for quickly experiencing and viewing the effect. Generally, in a project, it is often necessary to integrate through code. You can complete the quick inference of the pipeline with a few lines of code. The inference code is as follows:
from paddlex import create_pipeline
pipeline = create_pipeline(pipeline="instance_segmentation")
output = pipeline.predict(input="general_instance_segmentation_004.png", threshold=0.5)
for res in output:
    res.print()
    res.save_to_img(save_path="./output/")
    res.save_to_json(save_path="./output/")
In the above Python script, the following steps are performed:
(1) Instantiate the instance segmentation pipeline object through create_pipeline(), with specific parameter descriptions as follows:
| Parameter | Description | Type | Default | |
|---|---|---|---|---|
pipeline |
Pipeline name or path to pipeline config file, if it's set as a pipeline name, it must be a pipeline supported by PaddleX. | str |
None |
|
config |
Specific configuration information for the pipeline (if set simultaneously with the pipeline, it takes precedence over the pipeline, and the pipeline name must match the pipeline).
|
dict[str, Any] |
None |
|
device |
Pipeline inference device. Supports specifying the specific GPU card number, such as "gpu:0", other hardware specific card numbers, such as "npu:0", CPU such as "cpu". Supports specifying multiple devices simultaneously for parallel inference. For details, please refer to Pipeline Parallel Inference. | str |
None |
|
use_hpip |
Whether to enable the high-performance inference plugin. If set to None, the setting from the configuration file or config will be used. |
bool |
None | None |
hpi_config |
High-performance inference configuration | dict | None |
None | None |
(2) Call the predict() method of the instance segmentation pipeline object for inference prediction. This method will return a generator. The parameters of the predict() method and their descriptions are as follows:
| Parameter | Description | Type | Options | Default |
|---|---|---|---|---|
input |
Data to be predicted, supports multiple input types, required | Python Var|str|list |
|
None |
threshold |
Low score object filtering threshold for the model | float|None |
|
None |
(3) Process the prediction results. The prediction result for each sample is of type dict and supports operations such as printing, saving as an image, and saving as a json file:
| Method | Description | Parameter | Type | Parameter Description | Default Value |
|---|---|---|---|---|---|
print() |
Print the result to the terminal | format_json |
bool |
Whether to format the output content using JSON indentation |
True |
indent |
int |
Specify the indentation level to beautify the output JSON data, making it more readable. Effective only when format_json is True |
4 | ||
ensure_ascii |
bool |
Control whether non-ASCII characters are escaped to Unicode. When set to True, all non-ASCII characters will be escaped; False retains the original characters. Effective only when format_json is True |
False |
||
save_to_json() |
Save the result as a json file | save_path |
str |
Path to save the file. If it is a directory, the saved file name will be consistent with the input file type | None |
indent |
int |
Specify the indentation level to beautify the output JSON data, making it more readable. Effective only when format_json is True |
4 | ||
ensure_ascii |
bool |
Control whether non-ASCII characters are escaped to Unicode. When set to True, all non-ASCII characters will be escaped; False retains the original characters. Effective only when format_json is True |
False |
||
save_to_img() |
Save the result as an image file | save_path |
str |
Path to save the file. Supports directory or file path | None |
-
Calling the
print()method will print the result to the terminal. The content printed to the terminal is explained as follows:-
input_path:(str)Input path of the image to be predicted -
page_index:(Union[int, None])If the input is a PDF file, it indicates the current page of the PDF; otherwise, it isNone -
boxes:(list)Detection box information, each element is a dictionary containing the following fields: cls_id:(int)Class IDlabel:(str)Class namescore:(float)Confidence of the detection box-
coordinate:(list)Coordinates of the detection box, in the format [xmin, ymin, xmax, ymax] -
masks:...The actual predicted mask of the instance segmentation model. Due to the large amount of data, it is not convenient to print directly, so it is replaced with.... You can save the prediction result as an image usingres.save_to_imgor save it as a json file usingres.save_to_json.
-
-
Calling the
save_to_json()method will save the above content to the specifiedsave_path. If specified as a directory, the saved path will besave_path/{your_img_basename}_res.json. If specified as a file, it will be saved directly to that file. Since json files do not support saving numpy arrays,numpy.arraytypes will be converted to lists. -
Calling the
save_to_img()method will save the visualization result to the specifiedsave_path. If specified as a directory, the saved path will besave_path/{your_img_basename}_res.{your_img_extension}. If specified as a file, it will be saved directly to that file. -
In addition, you can also obtain the visualized image and prediction results through attributes, as follows:
| Attribute | Description |
|---|---|
json |
Get the prediction result in json format |
img |
Get the visualized image in dict format |
- The prediction result obtained by the
jsonattribute is a dictionary type, and the content is consistent with the content saved by calling thesave_to_json()method. - The prediction result returned by the
imgattribute is a dictionary type. The key isres, and the corresponding value is anImage.Imageobject: an object used to display the prediction result of instance segmentation.
In addition, you can obtain the instance segmentation pipeline configuration file and load the configuration file for prediction. You can execute the following command to save the result in my_path:
If you have obtained the configuration file, you can customize the settings for the instance segmentation pipeline by simply modifying the pipeline parameter value in the create_pipeline method to the path of the configuration file. An example is as follows:
from paddlex import create_pipeline

pipeline = create_pipeline(pipeline="./my_path/instance_segmentation.yaml")

output = pipeline.predict(
    input="./general_instance_segmentation_004.png",
    threshold=0.5,
)
for res in output:
    res.print()
    res.save_to_img("./output/")
    res.save_to_json("./output/")
Note: The parameters in the configuration file are the pipeline initialization parameters. If you wish to change the initialization parameters of the general instance segmentation pipeline, you can directly modify the parameters in the configuration file and load the configuration file for prediction. Additionally, CLI prediction also supports passing in a configuration file, simply specify the path of the configuration file with --pipeline.
3. Development Integration/Deployment
If the pipeline meets your requirements for inference speed and accuracy, you can proceed directly with development integration/deployment.
If you need to integrate the pipeline into your Python project, you can refer to the example code in 2.2.2 Python Script Method.
Moreover, PaddleX also provides three other deployment methods, as detailed below:
🚀 High-Performance Inference: In practical production environments, many applications have stringent performance requirements for deployment strategies, especially in terms of response speed, to ensure efficient system operation and smooth user experience. To this end, PaddleX offers a high-performance inference plugin that deeply optimizes model inference and pre/post-processing to significantly speed up the end-to-end process. For detailed information on high-performance inference, please refer to the PaddleX High-Performance Inference Guide.
☁️ Service Deployment: Service deployment is a common form of deployment in practical production environments. By encapsulating inference functionality into services, clients can access these services via network requests to obtain inference results. PaddleX supports various pipeline service deployment solutions. For detailed information on pipeline service deployment, please refer to the PaddleX Service Deployment Guide.
Below are the API references for basic service deployment and examples of multi-language service calls:
API Reference
For the main operations provided by the service:
- The HTTP request method is POST.
- Both the request body and response body are JSON data (JSON objects).
- When the request is successfully processed, the response status code is
200, and the attributes of the response body are as follows:
| Name | Type | Meaning |
|---|---|---|
logId |
string |
The UUID of the request. |
errorCode |
integer |
Error code. Fixed at 0. |
errorMsg |
string |
Error description. Fixed at "Success". |
result |
object |
Operation result. |
- When the request is not successfully processed, the attributes of the response body are as follows:
| Name | Type | Meaning |
|---|---|---|
logId |
string |
The UUID of the request. |
errorCode |
integer |
Error code. Same as the response status code. |
errorMsg |
string |
Error description. |
The main operations provided by the service are as follows:
infer
Perform instance segmentation on an image.
POST /instance-segmentation
- The attributes of the request body are as follows:
| Name | Type | Meaning | Required |
|---|---|---|---|
image |
string |
The URL of the image file accessible by the server or the Base64 encoded content of the image file. | Yes |
threshold |
number | null |
Please refer to the description of the threshold parameter of the pipeline object's predict method. |
No |
visualize |
boolean | null |
Whether to return the final visualization image and intermediate images during the processing.
For example, adding the following setting to the pipeline config file: visualize parameter in the request.If neither the request body nor the configuration file is set (If visualize is set to null in the request and not defined in the configuration file), the image is returned by default.
|
No |
- When the request is successfully processed, the
resultof the response body has the following attributes:
| Name | Type | Meaning |
|---|---|---|
instances |
array |
Information about the location, category, and other details of instances. |
image |
string| null |
The result image of instance segmentation. The image is in JPEG format and encoded using Base64. |
Each element in instances is an object with the following attributes:
| Name | Type | Meaning |
|---|---|---|
bbox |
array |
The location of the instance. The elements in the array are the x-coordinate of the top-left corner, the y-coordinate of the top-left corner, the x-coordinate of the bottom-right corner, and the y-coordinate of the bottom-right corner. |
categoryId |
integer |
The category ID of the instance. |
categoryName |
string |
The label name of the instance category. |
score |
number |
The score of the instance. |
mask |
object |
The segmentation mask of the instance. |
The attributes of mask are as follows:
| Name | Type | Meaning |
|---|---|---|
rleResult |
str |
The run-length encoding result of the mask. |
size |
array |
The shape of the mask. The elements in the array are the height and width of the mask. |
result example is as follows:
{
"instances": [
{
"bbox": [
162.39381408691406,
83.88176727294922,
624.0797119140625,
343.4986877441406
],
"categoryId": 33,
"score": 0.8691174983978271,
"mask": {
"rleResult": "xxxxxx",
"size": [
259,
462
]
}
}
],
"image": "xxxxxx"
}
Multi-Language Service Call Examples
Python
import base64
import requests

API_URL = "http://localhost:8080/instance-segmentation"  # Service URL
image_path = "./demo.jpg"
output_image_path = "./out.jpg"

# Encode the local image using Base64
with open(image_path, "rb") as file:
    image_bytes = file.read()
    image_data = base64.b64encode(image_bytes).decode("ascii")

payload = {"image": image_data}  # Base64-encoded file content or image URL

# Call the API
response = requests.post(API_URL, json=payload)

# Process the response data
assert response.status_code == 200
result = response.json()["result"]
with open(output_image_path, "wb") as file:
    file.write(base64.b64decode(result["image"]))
print(f"Output image saved at {output_image_path}")
print("\nInstances:")
print(result["instances"])
C++
#include <iostream>
#include "cpp-httplib/httplib.h" // https://github.com/Huiyicc/cpp-httplib
#include "nlohmann/json.hpp" // https://github.com/nlohmann/json
#include "base64.hpp" // https://github.com/tobiaslocker/base64

int main() {
    httplib::Client client("localhost:8080");
    const std::string imagePath = "./demo.jpg";
    const std::string outputImagePath = "./out.jpg";

    httplib::Headers headers = {
        {"Content-Type", "application/json"}
    };

    // Encode the local image using Base64
    std::ifstream file(imagePath, std::ios::binary | std::ios::ate);
    std::streamsize size = file.tellg();
    file.seekg(0, std::ios::beg);

    std::vector<char> buffer(size);
    if (!file.read(buffer.data(), size)) {
        std::cerr << "Error reading file." << std::endl;
        return 1;
    }
    std::string bufferStr(reinterpret_cast<const char*>(buffer.data()), buffer.size());
    std::string encodedImage = base64::to_base64(bufferStr);

    nlohmann::json jsonObj;
    jsonObj["image"] = encodedImage;
    std::string body = jsonObj.dump();

    // Call the API
    auto response = client.Post("/instance-segmentation", headers, body, "application/json");
    // Process the response data
    if (response && response->status == 200) {
        nlohmann::json jsonResponse = nlohmann::json::parse(response->body);
        auto result = jsonResponse["result"];

        encodedImage = result["image"];
        std::string decodedString = base64::from_base64(encodedImage);
        std::vector<unsigned char> decodedImage(decodedString.begin(), decodedString.end());
        std::ofstream outputImage(outputImagePath, std::ios::binary | std::ios::out);
        if (outputImage.is_open()) {
            outputImage.write(reinterpret_cast<char*>(decodedImage.data()), decodedImage.size());
            outputImage.close();
            std::cout << "Output image saved at " << outputImagePath << std::endl;
        } else {
            std::cerr << "Unable to open file for writing: " << outputImagePath << std::endl;
        }

        auto instances = result["instances"];
        std::cout << "\nInstances:" << std::endl;
        for (const auto& inst : instances) {
            std::cout << inst << std::endl;
        }
    } else {
        std::cout << "Failed to send HTTP request." << std::endl;
        return 1;
    }

    return 0;
}
Java
import okhttp3.*;
import com.fasterxml.jackson.databind.ObjectMapper;
import com.fasterxml.jackson.databind.JsonNode;
import com.fasterxml.jackson.databind.node.ObjectNode;

import java.io.File;
import java.io.FileOutputStream;
import java.io.IOException;
import java.util.Base64;

public class Main {
    public static void main(String[] args) throws IOException {
        String API_URL = "http://localhost:8080/instance-segmentation"; // Service URL
        String imagePath = "./demo.jpg"; // Local image
        String outputImagePath = "./out.jpg"; // Output image

        // Encode the local image to Base64
        File file = new File(imagePath);
        byte[] fileContent = java.nio.file.Files.readAllBytes(file.toPath());
        String imageData = Base64.getEncoder().encodeToString(fileContent);

        ObjectMapper objectMapper = new ObjectMapper();
        ObjectNode params = objectMapper.createObjectNode();
        params.put("image", imageData); // Base64-encoded file content or image URL

        // Create an OkHttpClient instance
        OkHttpClient client = new OkHttpClient();
        MediaType JSON = MediaType.Companion.get("application/json; charset=utf-8");
        RequestBody body = RequestBody.Companion.create(params.toString(), JSON);
        Request request = new Request.Builder()
                .url(API_URL)
                .post(body)
                .build();

        // Call the API and process the response data
        try (Response response = client.newCall(request).execute()) {
            if (response.isSuccessful()) {
                String responseBody = response.body().string();
                JsonNode resultNode = objectMapper.readTree(responseBody);
                JsonNode result = resultNode.get("result");
                String base64Image = result.get("image").asText();
                JsonNode instances = result.get("instances");

                byte[] imageBytes = Base64.getDecoder().decode(base64Image);
                try (FileOutputStream fos = new FileOutputStream(outputImagePath)) {
                    fos.write(imageBytes);
                }
                System.out.println("Output image saved at " + outputImagePath);
                System.out.println("\nInstances: " + instances.toString());
            } else {
                System.err.println("Request failed with code: " + response.code());
            }
        }
    }
}
Go
package main

import (
    "bytes"
    "encoding/base64"
    "encoding/json"
    "fmt"
    "io/ioutil"
    "net/http"
)

func main() {
    API_URL := "http://localhost:8080/instance-segmentation"
    imagePath := "./demo.jpg"
    outputImagePath := "./out.jpg"

    // Encode the local image in Base64
    imageBytes, err := ioutil.ReadFile(imagePath)
    if err != nil {
        fmt.Println("Error reading image file:", err)
        return
    }
    imageData := base64.StdEncoding.EncodeToString(imageBytes)

    payload := map[string]string{"image": imageData} // Base64 encoded file content or image URL
    payloadBytes, err := json.Marshal(payload)
    if err != nil {
        fmt.Println("Error marshaling payload:", err)
        return
    }

    // Call the API
    client := &http.Client{}
    req, err := http.NewRequest("POST", API_URL, bytes.NewBuffer(payloadBytes))
    if err != nil {
        fmt.Println("Error creating request:", err)
        return
    }

    res, err := client.Do(req)
    if err != nil {
        fmt.Println("Error sending request:", err)
        return
    }
    defer res.Body.Close()

    // Process the returned data
    body, err := ioutil.ReadAll(res.Body)
    if err != nil {
        fmt.Println("Error reading response body:", err)
        return
    }
    type Response struct {
        Result struct {
            Image      string   `json:"image"`
            Instances []map[string]interface{} `json:"instances"`
        } `json:"result"`
    }
    var respData Response
    err = json.Unmarshal([]byte(string(body)), &respData)
    if err != nil {
        fmt.Println("Error unmarshaling response body:", err)
        return
    }

    outputImageData, err := base64.StdEncoding.DecodeString(respData.Result.Image)
    if err != nil {
        fmt.Println("Error decoding base64 image data:", err)
        return
    }
    err = ioutil.WriteFile(outputImagePath, outputImageData, 0644)
    if err != nil {
        fmt.Println("Error writing image to file:", err)
        return
    }
    fmt.Printf("Image saved at %s.jpg\n", outputImagePath)
    fmt.Println("\nInstances:")
    for _, inst := range respData.Result.Instances {
        fmt.Println(inst)
    }
}
C#
using System;
using System.IO;
using System.Net.Http;
using System.Net.Http.Headers;
using System.Text;
using System.Threading.Tasks;
using Newtonsoft.Json.Linq;

class Program
{
    static readonly string API_URL = "http://localhost:8080/instance-segmentation";
    static readonly string imagePath = "./demo.jpg";
    static readonly string outputImagePath = "./out.jpg";

    static async Task Main(string[] args)
    {
        var httpClient = new HttpClient();

        // Encode the local image using Base64
        byte[] imageBytes = File.ReadAllBytes(imagePath);
        string image_data = Convert.ToBase64String(imageBytes);

        var payload = new JObject{ { "image", image_data } }; // Base64-encoded file content or image URL
        var content = new StringContent(payload.ToString(), Encoding.UTF8, "application/json");

        // Call the API
        HttpResponseMessage response = await httpClient.PostAsync(API_URL, content);
        response.EnsureSuccessStatusCode();

        // Process the API response data
        string responseBody = await response.Content.ReadAsStringAsync();
        JObject jsonResponse = JObject.Parse(responseBody);

        string base64Image = jsonResponse["result"]["image"].ToString();
        byte[] outputImageBytes = Convert.FromBase64String(base64Image);

        File.WriteAllBytes(outputImagePath, outputImageBytes);
        Console.WriteLine($"Output image saved at {outputImagePath}");
        Console.WriteLine("\nInstances:");
        Console.WriteLine(jsonResponse["result"]["instances"].ToString());
    }
}
Node.js
const axios = require('axios');
const fs = require('fs');

const API_URL = 'http://localhost:8080/instance-segmentation';
const imagePath = './demo.jpg';
const outputImagePath = './out.jpg';

let config = {
   method: 'POST',
   maxBodyLength: Infinity,
   url: API_URL,
   data: JSON.stringify({
    'image': encodeImageToBase64(imagePath)  // Base64-encoded file content or image URL
  })
};

// Encode the local image using Base64
function encodeImageToBase64(filePath) {
  const bitmap = fs.readFileSync(filePath);
  return Buffer.from(bitmap).toString('base64');
}

// Call the API
axios.request(config)
.then((response) => {
    // Process the response data
    const result = response.data['result'];
    const imageBuffer = Buffer.from(result['image'], 'base64');
    fs.writeFile(outputImagePath, imageBuffer, (err) => {
      if (err) throw err;
      console.log(`Output image saved at ${outputImagePath}`);
    });
    console.log('\nInstances:');
    console.log(result['instances']);
})
.catch((error) => {
  console.log(error);
});
PHP
<?php

$API_URL = "http://localhost:8080/instance-segmentation"; // Service URL
$image_path = "./demo.jpg";
$output_image_path = "./out.jpg";

// Encode the local image using Base64
$image_data = base64_encode(file_get_contents($image_path));
$payload = array("image" => $image_data); // Base64-encoded file content or image URL

// Call the API
$ch = curl_init($API_URL);
curl_setopt($ch, CURLOPT_POST, true);
curl_setopt($ch, CURLOPT_POSTFIELDS, json_encode($payload));
curl_setopt($ch, CURLOPT_HTTPHEADER, array('Content-Type: application/json'));
curl_setopt($ch, CURLOPT_RETURNTRANSFER, true);
$response = curl_exec($ch);
curl_close($ch);

// Process the response data
$result = json_decode($response, true)['result'];
file_put_contents($output_image_path, base64_decode($result['image']));
echo "Output image saved at " . $output_image_path . "\n";
echo "\nInstances:\n";
print_r($result['instances']);

?>
📱 On-Device Deployment: Edge deployment is a method of placing computing and data processing capabilities directly on user devices, allowing them to process data locally without relying on remote servers. PaddleX supports deploying models on edge devices such as Android. For detailed instructions on edge deployment, please refer to the PaddleX On-Device Deployment Guide. You can choose the appropriate deployment method based on your needs and proceed with the integration of AI applications.
4. Custom Development
If the default model weights provided by the general instance segmentation pipeline do not meet your requirements in terms of accuracy or speed, you can try to further fine-tune the existing model using your own domain-specific or application-specific data to improve the recognition performance of the general instance segmentation pipeline in your scenario.
4.1 Model Fine-Tuning
Since the general instance segmentation pipeline includes an instance segmentation module, if the pipeline's performance does not meet your expectations, you can analyze the images with poor segmentation results and refer to the corresponding fine-tuning tutorial links in the table below for model fine-tuning.
| Situation | Fine-Tuning Module | Fine-Tuning Reference Link |
|---|---|---|
| Prediction results are not as expected | Instance Segmentation Module | Link |
4.2 Model Application
After completing the fine-tuning training with your private dataset, you will obtain the local model weight file.
If you need to use the fine-tuned model weights, you only need to modify the pipeline configuration file by replacing the local path of the fine-tuned model weights in the corresponding position of the pipeline configuration file:
SubModules:
  InstanceSegmentation:
    module_name: instance_segmentation
    model_name: Mask-RT-DETR-S
    model_dir: null # Here replaced with the newly fine-tuned weight path.
    batch_size: 1
    threshold: 0.5
Subsequently, refer to the command-line or Python script methods in the local experience section to load the modified pipeline configuration file.
5. Multi-Hardware Support
PaddleX supports a variety of mainstream hardware devices, including NVIDIA GPU, Kunlunxin XPU, Ascend NPU, and Cambricon MLU. Simply modify the --device parameter to seamlessly switch between different hardware devices.
For example, if you use Ascend NPU for instance segmentation inference, the Python command is:
paddlex --pipeline instance_segmentation \
        --input general_instance_segmentation_004.png \
        --threshold 0.5 \
        --save_path ./output \
        --device npu:0
If you want to use the general instance segmentation pipeline on more types of hardware, please refer to PaddleX Multi-Hardware Usage Guide.